Computer Basics: Setting a Default Printer in Windows
You can tell Windows to use a default printer for all Windows applications. You may need to change this setting if you connect a new printer. Also, unfortunately, sometimes programs interfere with this setting and change it without verifying the change with the end user, requiring you to reset it.
To set the default printer in Windows:
Go to the Start Menu.
Select the Control Panel option.
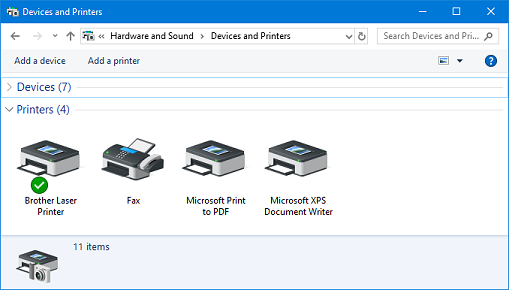
In the Hardware and Sound section, select View Devices & Printers.
A list of your connected printers is shown with a green check mark on the icon of the current default printer.

Right-click on the icon for the printer that you want as your default.
Select Set as Default Printer.
The green check mark will move to this printer.
If you're trying to print a document and are surprised when it goes to the wrong printer, use this procedure to set the default printer to your preferred device. This setting affects all Windows programs.
Most programs also allow you to select a printer other than the default one using the program's Print command.
Search Site
Recent Posts
About
Personal Knowbase is a note management program for Windows. Organize free-form text information using keywords.
To see if Personal Knowbase is right for you, please download a fully-functional 30-day software trial.
Tags
attachments backup clipboard dates documentation education export files find formatting getting started import information management installation interface keywords network PK Reader portability print query registration reports research security settings site info small business support time management upgrade Windows writers